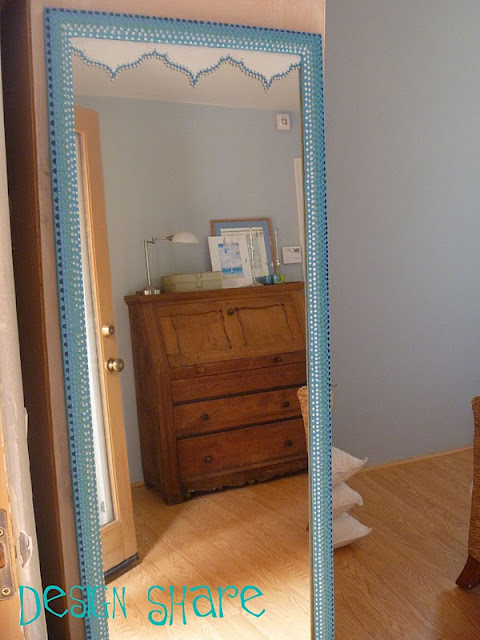
Apparently this mirror had lost it's powers in telling the fairest of them all, because I found it cast off to the roadside! Maybe it told it's owner she was NOT the fairest in the land or something , because otherwise who would throw away such a nice, vintage mirror? This is some quality glass, too...I took the backing off and lifted the glass out of the frame...it's about 1/4 inch thick, which is some seriously thick, heavy mirror!
It did have a few minor issues, but nothing a little paint couldn't cure!
There are all kinds of tutorials on how to 'antique' mirror glass for that vintage look....I have even payed extra for vintage mirrors with some of the mirror finish wearing off, so when I noticed one edge of this mirror glass with some pock marks and worn finish, I secretly smiled....and quickly loaded it in my car!
Now, I know I said I like that vintage, worn mirror look, but I decided to cover up the part of mirror that was worn out. Martha's paint line says ' one paint- all surfaces'... glass, wood, metal, ceramics, so I wanted to test it to see if it sticks to glass. I had a template I used for the shape and traced it onto the glass with a sharpie.
I chose a palette of blues and I used the glitter, satin and pearl finish paints in various tones. I had to do several coats of paint on the glass, but it did work!
A cute color called 'pond' was the base coat for the frame.
On a side note, can I just say how difficult it is to get a photo of a mirror, while it's laying flat on a table, without getting yourself or the camera strap in the shot?!
Starting at the outside bevel of the frame, I used glitter paint to make dots all the way around......
.........and then proceeded to make rows and rows of dots! I wanted a gradated look so used subsequently lighter and lighter shades of color....some glitter paint, some pearl paint. The shape on the glass looked rather plain, so I dotted that up too!
And voila', here is the Magic Mirror, all fixed up and ready to see the fairest in the land! I love the way it turned out!
Some things I learned regarding Martha's paints: The glitter paints tended to 'flatten' out as they dried, looking not so much like raised dots (what I intended) as flat circular shapes. Conversely, the pearl paints had excellent body and remained raised as they dried. The satin paint also has great body, thick texture and excellent coverage. If I were to do this project again, I would probably stick to the pearl paint and not use the glitter at all. It was just so enticing and...glittery, but not the best choice for this particular project. I can't wait to use it elsewhere, though! Just some things to keep in mind, in case you want to try a similar look for your projects.
Now, Mirror Mirror....DO tell, who is the fairest of them all?
Thanks for visiting and here's hoping that all your projects reflect well on you!
Linking up here:


4 comments:
Laura, I'm so glad you didn't go with your first try. Not that it was bad, but THIS is spectacular!!
Thanks Pamela!
The mirror is fabulous! I love the color and the dots, and especially how you added the pattern on the glass itself. Very creative. Good to know about the pearl paint, much easier than trying to glue pearl beads on.
So awesome. I think you have the creative genius of ten people. I'm such a fan. Thanks for linking up to Fabulous Friday.
Warmly, Michelle
Post a Comment