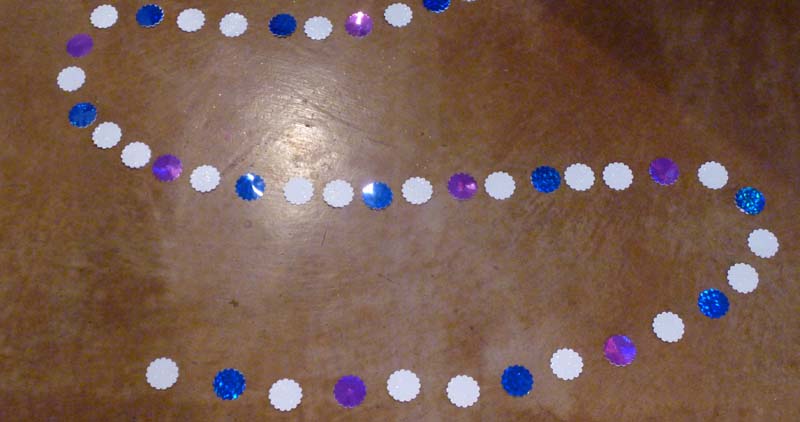
It's the trifecta of DIY projects and at this time of year, aren't we all looking for quick, cheap and easy solutions to holiday decorating? I am not in my own space right now and in fact will be moving over the Christmas break, so my decorating has been bare bones minimum. We do have a tree (artificial) which my daughter convinced me to buy. Goodwill was having their yearly 50% off every item in the store sale, so the tree cost only 12 bucks! Since all my ornaments and other Christmas accoutrements are in storage, I had to decorate the tree using found objects, second hand ornaments and a garland I made using craft paper sheets, a craft punch, fishing line and hot glue. I really like the way the garland turned out and it would be a great to make for other occasions as well. It went really quick, was very cheap and couldn't be easier, so I wanted to share with you guys. Most of you will have already done your decorating, but this could be a last minute bit of bling to add to your tree, banister garland, mantle decoration or wherever!
Found these great prismatic and glitter paper packs at Target in their scrapbook section, only .99 cents for a two pack. Cost so far: $2.97
Using a craft paper punch in a fluted edge pattern, I punched out dozens of disks in all three colors of paper I had. Paper punch was on sale for $7.00
Then using fishing line and a hot glue gun, I glued the disks on in a random color pattern. Since garland tends to twist and turn, I made the disks double sided which also gave the fishing line a place to be glued in. A disk of paper right side down, a dollop of hot glue, the fishing line run through the hot glue and another paper disk, right side up, on top. Easy and it goes really fast when you make an assembly line. I made about 30 feet of garland in less than an hour. Fishing line was $2.99 and I have hundreds of feet left for other projects.
All the other ornaments were either from the thrift store or stuff I had around already. Another r e e e l l y easy thing I did was throw some mini glass ornaments in a hammered silver bowl I got at Goodwill for $2.99 The mini ornaments cost more than the bowl at $5.99 for a pack of 50! Rocket Science? No. Beautiful? Yes!
LOVE the way it gleams and the bowl reflects the ornaments, doubling the sparkle! So, just a few quick, cheap and easy tricks I used to brighten up my holiday. Here's to ho ho hoping your holidays sparkle and shine!
Showing posts with label Christmas. Show all posts
December 20, 2011
December 24, 2010
Merry Christmas!
Just in the St. Nick of time......A post to wish all a very Merry Christmas and a Happy, Joyous and Prosperous New Year!!!!
I love to see traditions from around the country and around the world, so I thought I'd show you all a tradition of mine that stems from living in Tucson. Every year around late September, the Agave plants in the desert send up large spikes that signal the end of the plants life. An agave can live 20 years or longer before sending up it's final bloom, sometimes up to 25' high. It is a true swan song, as the agave dies after such a beautiful output, and will only bloom just the once.
The agave stalk will eventually dry out in our arid climate, turning from a beautiful bright green to a woody, brown and extremely durable 'branch.' By late October they are usually ready to harvest.
Once dry, the agave stalks lend themselves to many ornamental uses. One such use is as a Christmas tree! So without further ado, here is MY Agave Stalk Christmas Tree!
I love to see traditions from around the country and around the world, so I thought I'd show you all a tradition of mine that stems from living in Tucson. Every year around late September, the Agave plants in the desert send up large spikes that signal the end of the plants life. An agave can live 20 years or longer before sending up it's final bloom, sometimes up to 25' high. It is a true swan song, as the agave dies after such a beautiful output, and will only bloom just the once.
| A beautiful example of an agave newly in bloom. |
![]() |
| Here is a great example of a fresh bloom and a dried one side by side. |
![]() |
| A completely dry stalk. |
Merry Christmas!!
December 12, 2010
Tripping the Light Fantastic
I Love Christmas lights!!! There is nothing more beautiful than driving around at night and seeing dark space punctuated by beautiful, glowing masses of colorful lights! I firmly believe they *should* be left up all year long. To that end, here is my contribution to the nightime winter skies.....
I will probably add more as the season marches on. These pictures don't do it justice....the color is so much more vibrant in person, and I have since added a disco ball!! Yes, that's right, a disco ball. Complete with a spinning motor which turns the mirrored orb and catches all the light and bounces it back in to the evening. It's gorgeous!
Enjoy the twinkle of this season and as always, I appreciate your visit!
xoxo,
I will probably add more as the season marches on. These pictures don't do it justice....the color is so much more vibrant in person, and I have since added a disco ball!! Yes, that's right, a disco ball. Complete with a spinning motor which turns the mirrored orb and catches all the light and bounces it back in to the evening. It's gorgeous!
Enjoy the twinkle of this season and as always, I appreciate your visit!
xoxo,
December 10, 2010
It's beginning to look a lot like Christmas....
Well, ok, I know I'm late to the game as it started to look like Christmas in October!! But for me, this is the perfect time to start decorating and getting in to the holiday spirit. I made my own wreaths this year, which I think look great, and couldn't be easier to do. This idea has been around for a while:
Using plastic bags cut into strips, simply tie them around a wire wreath frame until it's nice and full. I like to spray paint the wire frame silver so it blends with the plastic bags. Using this same idea, I cut felt into strips and tied them around another wire frame and the results, to me, are stunning! Again, soooo easy and they cost about $7 for the felt one and $5 for the plastic bag version. Click here for a tutorial.
Hot Pink and Turquoise ARE traditional Christmas colors, right?!
I might just leave them up year round!
Here are some of my other holiday decorations.
In the southwest, we use Agave stalks as Christmas trees! Here is one of mine festooned with my homemade glitter ornaments! This one, I DO keep up year long, minus the ornaments.
Hope you enjoyed a peek at my holiday decorating!
As always, please consider following me on the right sidebar and I do appreciate your visit!
Cheers,
Using plastic bags cut into strips, simply tie them around a wire wreath frame until it's nice and full. I like to spray paint the wire frame silver so it blends with the plastic bags. Using this same idea, I cut felt into strips and tied them around another wire frame and the results, to me, are stunning! Again, soooo easy and they cost about $7 for the felt one and $5 for the plastic bag version. Click here for a tutorial.
Hot Pink and Turquoise ARE traditional Christmas colors, right?!
I might just leave them up year round!
Here are some of my other holiday decorations.
In the southwest, we use Agave stalks as Christmas trees! Here is one of mine festooned with my homemade glitter ornaments! This one, I DO keep up year long, minus the ornaments.
Hope you enjoyed a peek at my holiday decorating!
As always, please consider following me on the right sidebar and I do appreciate your visit!
Cheers,
aLL THAT gLITTERS.....
Have I mentioned how attracted I am to shiny, glittery, sparkly things? Well, with that in mind I set out to make some beautiful, glittery baubles for my Christmas tree and the real tree in my front yard. I went to my "go to" craft store, Michaels, and found some really cute, pre-cut, heavy cardboard shapes for .99 cents for a bag of 12!! They come in so many shapes, it was hard to choose! Everything from pirate ships to guitars to hand and footprints to flowers to....well, you get the idea. A can of spray adhesive and some 'fine' glitter later, I had beautiful, glittery ornaments to adorn my tree!!
I am absolutely LOVING the Martha Stewart glitters that are available. They come in amazing colors and surprisingly, go a looong way. The "Anthracite" is the most beautiful, deep, gun-metal grey color I have ever seen! Would it be weird if I covered myself in adhesive and rolled in it? Wait....don't answer that!
You want to be generous with the glitter so you get a nice, even, opaque cover. You can always re-use what doesn't stick to the surface. The trick to getting a good coat is to use your fingertips to really 'mash' the glitter in to the adhesive.
A hole punch and some ribbon later, and voila! There you have it! Beautiful glittery ornaments that are easy to make and cost just pennies a piece. I love the way they glisten in our warm southwest sun!
Hope you enjoyed the sparkle! As always, I appreciate your visit. Won't you consider 'following' me on the right side bar? Thanks and Happy Holidays!
![]() | |||
| The supplies. |
![]() |
| Give a good coat of adhesive. |
![]() |
| A cool macro shot of the 'Tourmaline' glitter! |
![]() |
| And one of the 'Anthracite.' |
Hope you enjoyed the sparkle! As always, I appreciate your visit. Won't you consider 'following' me on the right side bar? Thanks and Happy Holidays!
Subscribe to:
Posts (Atom)