Showing posts with label Stencil. Show all posts

April 28, 2012

Hand Printed Slipcover for Vintage Settee

All right, let me just tell you, I am THRILLED with the result of my recent slipcover endeavor.  Remember the vintage settee I wrote about here, here and here? Well, I am finally finished and can't wait to show you how it turned out!! I actually finished this back on April 17th, but I took so many pictures, I had to go through them all, decide which ones were best and get them loaded on the laptop. Plus, for every project I write about, there are roughly ten others on the sidelines in various stages of progress. I twirl a lot of plates! I will let the pictures mostly speak for themselves, but I have to say again, this project turned out better than I had expected! I am so, so, so happy with the result. So here is a recap:

Started with this


Inspired by this
and this
via


   Made this stencil


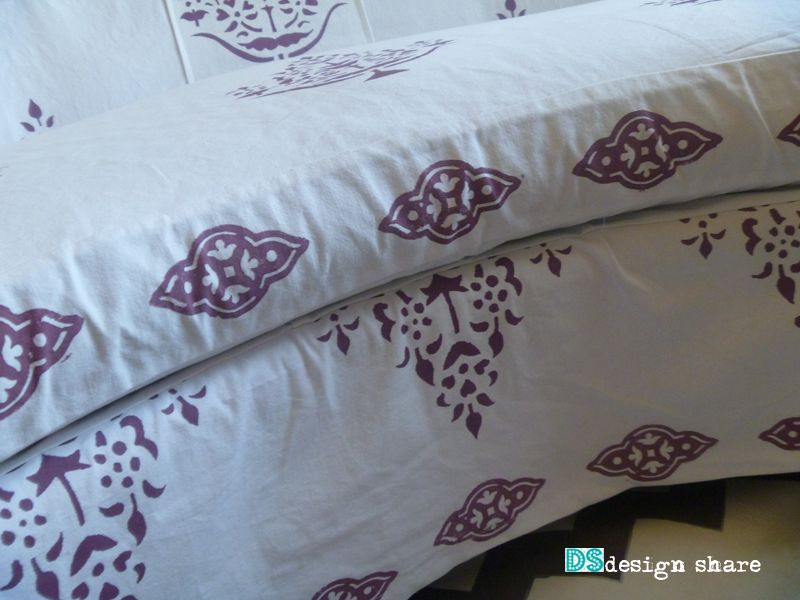
Printed this fabric
(six and a half yards of heavy white canvas)


Most of my fabric pieces had to have a curved shape, either cut on the bias or cut actually curved on the fabric itself.
This is an 'interior' shot of how I put things together. Even though I cut curves into the pieces, some parts still needed a dart here and there to ease the curves along. Here you can see some of those extra seams. This thing has more nips and tucks than Joan Rivers!


And made a slipcover


Not one to shy away from detail, I even printed the underside of the cushion platform.


So there you have it! 

I wish I could give you a step-by-step sewing tutorial, but my methods are a bit in-exact, what I refer to as 'hack and slice.' I really just draped the fabric roughly in it's place, lightly drew the outline for that piece on the settee (back, side piece, backrest, cushion pieces, etc.)cut it out, and pinned it all together before sewing to make sure it fit together properly. Because I printed my own fabric, six yards was enough since I wasn't having to match up the print on any two pieces. Cost breakdown: $40-61/2 yards of white canvas, $8-one quart of interior, flat paint in Grape Jelly by Martha Stewart and $5.99-two packs of stencil vellum. Settee was free. So based on the price of the couch I listed above as an inspiration for this, I saved $5946.01!! Ay, that's a lot of paisley! I will write later about some other changes I made to this area as a result of the slipcover being finished. As they say, one finished project prompts 5 others! Thanks for stopping by and I hope you like the settee; I really, really love it!

April 16, 2012

Slipcover Progress

Just wanted to keep you guys in the loop as far as the progress I am making on a slipcover for my vintage curved settee...yes, I said Progress! A couple of sneak peeks:

This is the current state of affairs in my living room. It's worse than it looks in this picture....much worse! Loose thread everywhere, straight pins all over the place, several pairs of scissors lying around, but it's a productive mess, so....

This is the stencil I cut specifically for this project. As you can see, I am using purple to print the fabric. I am having to cut the pieces first, print the fabric, then pin it all together before sewing, which is why I haven't finished yet! But it will be done soon......very soon!


My blog friend Michelle told me this would be a challenging piece to slipcover because it has a curved back and seat, and she was right! She would know about re-upholstering tricky curves and tight spots...see her amazing chair makeover here. I felt a bit like an engineering degree would come in handy in figuring out all the curves and angles and how they fit together. Needless to say, I ripped a lot of seams! It's a good learning curve, though.......get it? Learning curve....*cymbal clash*


And it's all coming together. 

I hope **fingers crossed** to have it finished today. I am really excited to have it finished and checked off the to-do list.

Stay Tuned!


April 15, 2012

Going For It

Remember the vintage curved settee I posted about here?


Well today I am tackling that beast and attempting to make a slipcover for it. You know how you always have a certain minds eye picture of what the finished product will look like? I only hope it comes out looking half as good as it does in my head!

 I got six yards of heavy white canvas for $6 a yard and I am printing the fabric myself using a stencil I cut.....again, in my head it will look fabulous!


This piece is tricky because of the curves and I have never slip-covered such a tailored piece before. It is really well made so just getting the tailored skirt off was a real pain in the arse!


There were about a million upholstery nails in that thing so I had to use my pliers and puuuulll with all my strength to get that skirt off!

It's not the easiest thing to heft around either...awkward shape so it tends to tilt and pivot exactly when you don't want it to.


ANYWAY...I'm going for it. I printed a test of the stencil I cut for this and I think it's going to look soooo good. Well, at least in my head...............

Wish me luck!


August 15, 2011

Oops! I did it again

OK, I really had no idea when I posted this project that it would turn out to be pretty much the *only* reason people visit my blog. I'm talking about my tablecloth turned floorcloth idea that has garnered quite a bit of attention...I'm not complaining mind you, far from it! I'm thrilled that people are visiting my blog and I get most of my traffic from Pinterest these days. I have gotten lots of questions about this project after the fact and tried to answer most of those questions in an edit to the post I linked to above. Some questions I didn't have answers to, so in an effort to answer those questions, I made another floorcloth! I did things a *bit* differently this time around, though.

Using a plain white, round tablecloth instead of an already printed one like I used before, I stenciled a design on the cloth.


I know one of the reasons the other floorcloth was so appealing was that there was minimal effort involved; Buy a cute printed cloth, roll on some polyurethane and be done with it. I like, however, knowing that this one will be unique because I painted the design myself. Food for thought for those of you thinking about doing this and making it 'your own.'

Once I finished stenciling, it was on to the polyurethane. As I said previously, it is VERY IMPORTANT that you use WATER BASED poly. Trust me.

It goes on milky, but will dry crystal clear. This time, I coated the front AND the back, two coats each. I plan on using this outdoors and wanted to make sure it had a good water-resistant surface. I recommend two coats on each side regardless of where you will use it. Once dry, it has a nice low luster sheen to it.


I have mine on my patio now in Arizona summer heat and so far, so good. Before I put it outside, I tested it in another spot. I had alot of readers asking if this would work over existing wall-to-wall carpeting. My answer: I don't know! BUT, I do now, because my good friend was the willing guinea pig in a three week long experiment that leads me to say YES! This can work on carpeting IF you follow some guidelines. First, an extremely plush carpet with a very long pile or really thick foam padding would probably not work. My friend has your ordinary, standard wall-to-wall that you see in pretty much every home that has carpeting. She has kids, she has pets, including a male Bichon that is a prolific pee-er! We tested the floorcloth in her TV room.

If any furniture will be placed on top of the floorcloth, prevent indents by folding up a piece of thick paper and placing under furniture legs and such. If it can be avoided, all the better.

Some puckering did occur after the three week test period, but I used a warm iron (not too hot!) and a pressing cloth and the puckering came right out.


It held up really well to frequent male visitors playing x-box games and walking all over it with their big shoes. These were grown men mind you, big, burly, grown men, friends of the family. It withstood three weeks of several times a week foot traffic by these guys. It's a pretty good test run!

I also did a water test. I poured some water on the cloth..........

 and let it sit for 15 minutes..............

20 minutes......................

45 minutes...................and it just sat there on the surface, waiting for me to mop it up.

After 45 Minutes
I have since made several other floorcloths using different fabrics and shapes and they all turned out very well! I will share those with you too, later. Another reader asked if these could be folded. The answer is no, I would not recommend folding, it would leave a crease that would most likely be permanent. For storage, I would recommend rolling and storing in a heavy cardboard tube.


So, there you have it! A bit more effort this time around, but another beautiful floorcloth as the end result. Don't you love the possibility? Thanks for visiting today, see you next time.


Related Posts Plugin for WordPress, Blogger...