September 22, 2011

Mirror, Mirror

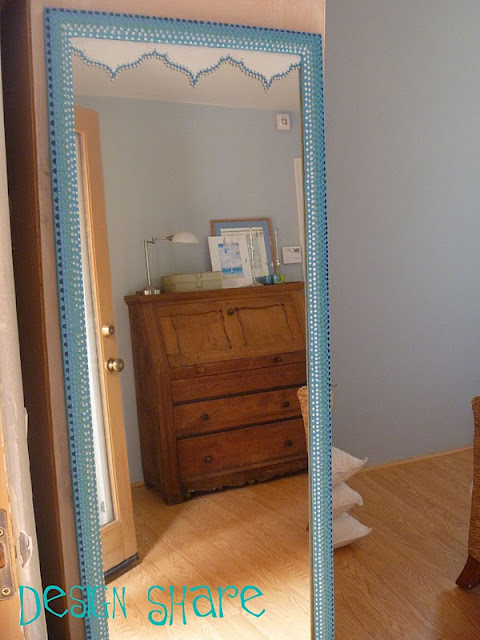
Apparently this mirror had lost it's powers in telling the fairest of them all, because I found it cast off to the roadside! Maybe it told it's owner she was NOT the fairest in the land or something , because otherwise who would throw away such a nice, vintage mirror? This is some quality glass, too...I took the backing off and lifted the glass out of the frame...it's about 1/4 inch thick, which is some seriously thick, heavy mirror!

 It did have a few minor issues, but nothing a little paint couldn't cure!
There are all kinds of tutorials on how to 'antique' mirror glass for that vintage look....I have even payed extra for vintage mirrors with some of the mirror finish wearing off, so when I noticed one edge of this mirror glass with some pock marks and worn finish, I secretly smiled....and quickly loaded it in my car!

This was my first attempt at resuscitation. Not the look I was going for, but those were the only colors I had at the time....the magic was still missing.  I let it sit for a few days and still nothing was coming to me. Then I went and looked at Martha's new line of craft paint at Michaels and got some inspiration. She has some cool applicator bottles that you can write with, draw with, or as I chose to do, make dots with!

Now, I know I said I like that vintage, worn mirror look, but I decided to cover up the part of mirror that was worn out. Martha's paint line says ' one paint- all surfaces'... glass, wood, metal, ceramics, so I wanted to test it to see if it sticks to glass. I had a template I used for the shape and traced it onto the glass with a sharpie.

I chose a palette of blues and I used the glitter, satin and pearl finish paints in various tones. I had to do several coats of paint on the glass, but it did work!

A cute color called 'pond' was the base coat for the frame.

On a side note, can I just say how difficult it is to get a photo of a mirror, while it's laying flat on a table, without getting yourself or the camera strap in the shot?!

Starting at the outside bevel of the frame, I used glitter paint to make dots all the way around......

.........and then proceeded to make rows and rows of dots! I wanted a gradated look so used subsequently lighter and lighter shades of color....some glitter paint, some pearl paint. The shape on the glass looked rather plain, so I dotted that up too!


And voila', here is the Magic Mirror, all fixed up and ready to see the fairest in the land! I love the way it turned out!


Some things I learned regarding Martha's paints: The glitter paints tended to 'flatten' out as they dried, looking not so much like raised dots (what I intended) as flat circular shapes. Conversely, the pearl paints had excellent body and remained raised as they dried. The satin paint also has great body, thick texture and excellent coverage. If I were to do this project again, I would probably stick to the pearl paint and not use the glitter at all. It was just so enticing and...glittery, but not the best choice for this particular project. I can't wait to use it elsewhere, though! Just some things to keep in mind, in case you want to try a similar look for your projects.
Now, Mirror Mirror....DO tell, who is the fairest of them all?
Thanks for visiting and here's hoping that all your projects reflect well on you!

Linking up here:


September 9, 2011

Say Wha...?

So, I was writing a new post, went to upload some pictures and got this error message:

We're sorry, but you have exceeded your photo upload quota. For more information, check out this Blogger help page.

Huh? I never knew about this. Have I been under a rock? Nowhere in blogland have I read or heard anything about exceeding a photo upload limit. I realize it has to do with available space allotted for something that's basically free, but I never knew!! Can anybody out there enlighten me? Do I now have to pay to put photos up on my blog? Just wondering what every one else's experience is. Please, DO tell.....

September 2, 2011

It ain't rocket science.....

.....but it is a fun Style File segment! Most people, especially design bloggers, already have a wealth of knowledge on how to re-purpose, refinish or re-style furniture. These are just a few of the tips I shared with the locals here in Tucson. It's a fun thing I get to do about once a month and came about after I went on the Nate Berkus Show. The people at KVOA are so nice and they keep letting me come back! So enjoy and have a great Labor Day weekend!

September 1, 2011

I found the Ruby....Slippers?

Yes, it's true!! Passing through Dillard's, something sparkly caught my eye in the shoe section. Never one to pass up something sparkly, I went over to investigate and discovered.....Uggs?! Uggs! Yes, there they were in all their Ugginess, covered cuff to toe in Red, Gold, Black and Silver sequins.


Uuummm, Uggs? Uggs! Well, I wasn't sure weather to laugh or cry. On one hand, all that glittery goodness, all the sparkle, the pure joy to look down at my feet and see glimmering paillettes of happiness smiling back up at me!! But then to realize, sequined Uggs on my 10.5 size boats, never the twain shall meet (sad face here) As much as I love the sparkle, the reason I have never owned Uggs is because they make my already BIG feet look even BIGGER! Not fair! Who wouldn't want Ruby Slippers that were also warm and comfy?


Just click your heels together three times......

And these silver beauties speak all too well to my inner Magpie, virtually distracting all other thoughts with their gleam.....
Ah well, a girl can dream and admire from a distance...I'll have to get my sparkle on elsewhere. Maybe I could work them into a Halloween costume! Alas, at $170 retail, don't think that will happen either. Ugg!


Related Posts Plugin for WordPress, Blogger...